
beaded object class
unit 2
Designing
Now that you have a foundation to bead on we can start to design. You want your skin to fit your object like a glove so now is the time to fine tune it rather than later when it is beaded. This a a good time to collect your bead and component stash. Tape your skin or foundation to your object and start to lay out some ideas. Allow yourself to enjoy this process, take your time, don't get stressed out about whether this is right or wrong. Just open up to your heart, open to spirit and play with what comes.
Remember that not everything has to be covered with beads, sometimes the object calls to have some space. I think it also depends on the object and what it is made from. Also realize that this can and just might change as you grow with the piece.
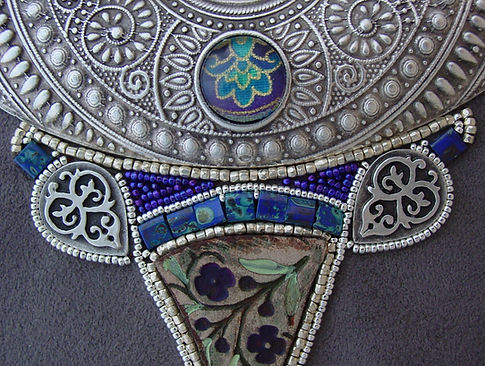
The story of the shapeshifter


The owl piece called "Shapeshifter" was born in 2010. Long story short, my husband found a dead owl along the road that had been hit by a car. He brought it home to me, because normally I like feathers and quills and such. But it didn't feel right to take anything from this beautiful bird. This was before I started practicing Shamanism, and might have known how to ask permission.
So I buried the owl on our property and gave it a ceremony as best as I knew how. Well a year later the owls skull appeared on the ground about where we buried it. I still have the skull, it is a very scared and special gift to me.
So this is how I got inspired to make Shapeshifter. I found a company called Bone Clones they make skulls out of resin. They sell them to schools and places that use them to educate the public. They have every skull imaginable even human.
I purchased a Great Horned Owl skull, I also found an online taxidermy place and ordered some eyes to match. Now I have everything I need to recreate this amazing bird....somehow.
But how, how do I cover this skull with beads. I first needed to know what I was going to make with the skull, in this case I wanted to make a necklace. But the skull was large, who would want a necklace that big with this owl looking straight at you? So I cut the skull on a slight angle so it wasn't so over bearing and more natural looking. I use a jeweler saw to cut most of my objects when needed.
Now to make a pattern, yes masking tape. I made a skin using masking tape. I filled in the empty space in the skull with a light weight clay and glued the eye in-place. Than taped the skull up. I cut around the eyes, and sectioned off where best to have a seam, sewing the pieces back together just as you did in the first unit.
Now to lay out the design. Where and what kind of beads do you want to use? Are you adding cabochons? For the owl it helped to have a photo of an owl, as I knew I wanted dagger beads to look like feathers. I also knew I wanted it to have a stone or metal component to run the center of his head. I also knew that he would be glued to a foundation that I would than bead around.
There was a lot of beading, and than stretching it back in place to see how it would look, and noticing where more beads needed to be placed or removed.
The process is long and the ideas may change, you need to think about how it will be placed back on your object and most importantly in what order.
Laying out your design
Materials needed
• Object to bead upon
• assorted components and beads
• Masking tape
• double sided tape
• fine tip marker
•Foundation sewn together
Once you skin is ready to be place on you object, you can use double sided tape, or by folding any kind of tape to make it double sided works too. Tape the skin to you object. This is a good time to make sure your skin fits like a glove, don't worry to much about areas where you may be joining a seam once everything is beaded you can always trim excess suede.
Use tape on the back of your components to place them in various places. Try to give your piece some balance, so even if your components aren't going to be laid out symmetrically, place them so they balance one another. You don't want a bunch of heavy components on one side, unless that is the design you are going for. Also balance your colors to make them blend into one another. Can you fill certain areas with fabric, fur, lace or trim.
I have found that even when I layout my component ideas they change as I start to bead. I don't like to glue all my components down at once, as I mentioned I find many times once I bead around something it changes. I also like to work on one side at a time but you may find you want to bounce back and forth. There is no right or wrong way here.
If you have a seam where two parts will be joined later it helps to use a fine tip marker and allow your lines to flow over the seam, these lines will later be beads. You may be wondering if it matters if the seams we sewed back together should be in the front or back, the answer is no it doesn't matter, but I would stick to one or the other rather than mixing them up. You can also glue a component half on the edge of your foundation to hide a seam where the another section will meet. You will need to bead an area on the other section opposite edge where that component meets or fits in place. Than when you reassemble the skins they all fit together. This is tricky but also a great way to hide a seam.
If you have eyes for an animal, you may want to glue the eyes right on the object, than placing the skin over the eyes, you can use a hole punch or utility knife and cut the eye out. I keep the hole a bit smaller than the eye so it looks more realistic like an eye lid.


Lay out the components and beads you are thinking about using.
Use double sided tape to hold the components in place as you design.
Play with different ideas and placements.
Gluing and stitching comes next
Video below
Gluing and Back stitching
Materials needed
• Object to bead upon
• assorted components and beads
• beading needles
• beading thread
• scissors
•Foundation sewn together
• E6000 or Two part epoxy glues
Gluing your components is just as important as the beadwork. If your a sloppy gluer so will your work be. Sorry to be so blunt but there is truth in it. I always put my glue on a small separate piece of paper and than use a toothpick to spread my glue on the components. It's also important to spread the glue to the very edge of your components use the toothpick to clean up any excess glue that seeps out upon placement. I also use sandpaper to rough up that back of a cabochon for better adhesion.
Bead embroidery is very easy to learn, I assume most of you know how or you wouldn't be taking this class. The most used stitch is known as the back stitch. There are probably many different ways to do the back stitch so I will share mine. Normally you start with 4 beads and than bring your needle back up through the last two beads. But I also use 6 beads to do my back stitch I find it works faster and with the same results, more on that in the video and PDF. I want you to use what is comfortable for you.
Basic Back Stitch:
This is a simple stitch you can use for all kinds of applications. It’s great for going around small cabochons or doing small detail work. Thread a #12 sharp beading needle with 2-ft, length of thread and knot one end. Sew up through the foundation next to a stone or wherever you want to start. Pick up four beads and pull them down to the suede laying them in the direction you want them to go, this could be next to a stone, following a straight line, wherever your path leads you. Now push your needle down through the suede next to where the fourth bead rests pulling all the thread and beads down tight to the suede. With your needle go back up between the second and third bead and push your needle and thread through the last two beads, now you can add another four beads and repeat the process as far as you need to go. After you have gone around your cabochon or finished your row make sure and go back through the whole row of beads, this pulls the row of beads nicely together and straightens it as well. You can add as many rows as you wish, when adding other rows make sure not to start them to close to the first row or this will cause them to bunch and not lay flat.

Video below
